
The Nintendo Switch is an awesome gaming console with tons of games that you can play at home or on the go. Part of getting a Switch though is buying all the extras that will make your gaming experience much better such as extra controllers, carry-on cases, and most importantly, a microSD Card so you can have all the games you want at the ready without having to switch cartridges.
The question is… what kind of microSD Card do you need and why?
It’s always nice to just take out the Switch when you have some time on your hands and quickly play a game. The reality though is that, since there are just so many options for games on the Nintendo Switch, it’s kind of a pain to reach into your stash and switch cartridges all the time. It’s almost always better just to have everything stored on the memory of your Switch and choose your game right from the home screen.

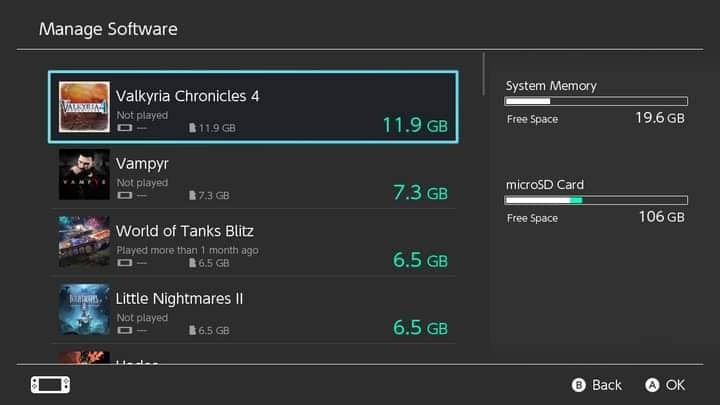

A Classic Nintendo Switch and a Nintendo Switch Lite both have an internal storage space of 32 GB while a Nintendo Switch OLED Model has 64 GB. That might not seem bad, but if you take into account the file size of certain games, you’ll start to realize that’s not a lot.
For instance, Pokemon Violet and Scarlet are 10 GB each, Fire Emblem Warriors: Three Hopes takes up 13.4 GB, and The Legend of Zelda: Breath of the Wild is 14.4 GB. And these are still quite reasonable sizes.
You also have games like The Witcher 3: Wild Hunt which has a massive 31.5 GB install size, then there’s NBA 2K22 which takes up a whopping 49.4 GB! What this means is that you’re not going to have a lot of games at the ready if you’re just relying on the Nintendo Switch’s internal memory. Therefore, you’ll want to expand your memory so you won’t have to keep deleting games to make all of them fit.
To expand your memory, you need a microSD card. Not just any microSD card though as there are more things to consider regarding what kind of memory card you should get. According to the Nintendo Support Site, there are 3 kinds of microSD cards that you can use.
- microSD (up to 2 GB)
- microSDHC (4 GB – 32 GB)
- microSDXC (64 GB and above)
Additionally, the Support Site also mentions that “In order to improve your gameplay experience, using a microSD card with a higher transfer speed is recommended.” Hence, you’ll want to keep the following guidelines in mind if you want to use a high-speed microSD:
- UHS-I (Ultra High Speed Phase I) compatible
- Transfer speed 60 – 95 MB/sec (the higher the transfer speed, the better gameplay experience on Nintendo Switch)
![]()
Therefore, we recommend that you use the Transcend microSDXC 340S. Firstly, capacity-wise, you can choose between 64, 128, and 256 GB depending on your need in terms of how many games you want to keep installed in your Switch at the same time.
Next, this card utilizes UHS-I technology with read/write speeds of up to 160MB/s and 125MB/s respectively. That means that your games’ loading times won’t be too long, even if your game is stored on an external memory source. You can check out more details on the Transcend microSDXC 340S HERE.
![]()
Now, some of you might think that, just because the microSD is an external storage chip that it might cause your games to load slower than those that are just installed in your actual Switch and actual cartridges. You’d be surprised to know that this isn’t completely the case! We actually tested this on our own with various games and we saw for ourselves that the load times for the games stored in the microSD actually had faster loading times than the cartridge-based games and only very slightly slower than those stored on the internal Nintendo Switch memory! This fact was actually already established before in videos like this one made by Digital Foundry. Definitely another strong reason for you to get your games on a microSD as soon as you can!
![]()
Installing the microSD card to your Switch is no hassle at all. Just pop open the stand at the back of your Nintendo Switch, slide the microSD card into the slot, and gently push down until it clicks into place. Just be sure that the card is properly positioned with the label facing away from the Switch. Afterward, you just need to format the microSD card by following the steps below, as stated by the Support Site:
- From the HOME Menu, select “System Settings.”
- Scroll down the options on the left and select “System.”
- Scroll down the options on the right-hand side and select “Initialize.”
- If prompted, enter your Parental Controls PIN.
- Select “Format microSD Card,” then “Continue.” Important: The following message will be displayed, “All data on the microSD card will be deleted. Data cannot be restored once it is deleted. Continue?”
- To continue, select “Format.” The console will then restart.
With that, you’re all set and ready to store even more games on your Nintendo Switch. Ease of use is one of the primary aspects of the Switch so be sure to get the most out of it by reducing the hassle of switching cartridges every time you want to change games to play. Be sure to upgrade your Switch storage as soon as you can!